Admin Guide
To use efficiently the zPodFactory framework, you need to understand the following concepts depicted in the diagram below:
Overview High Level Diagram
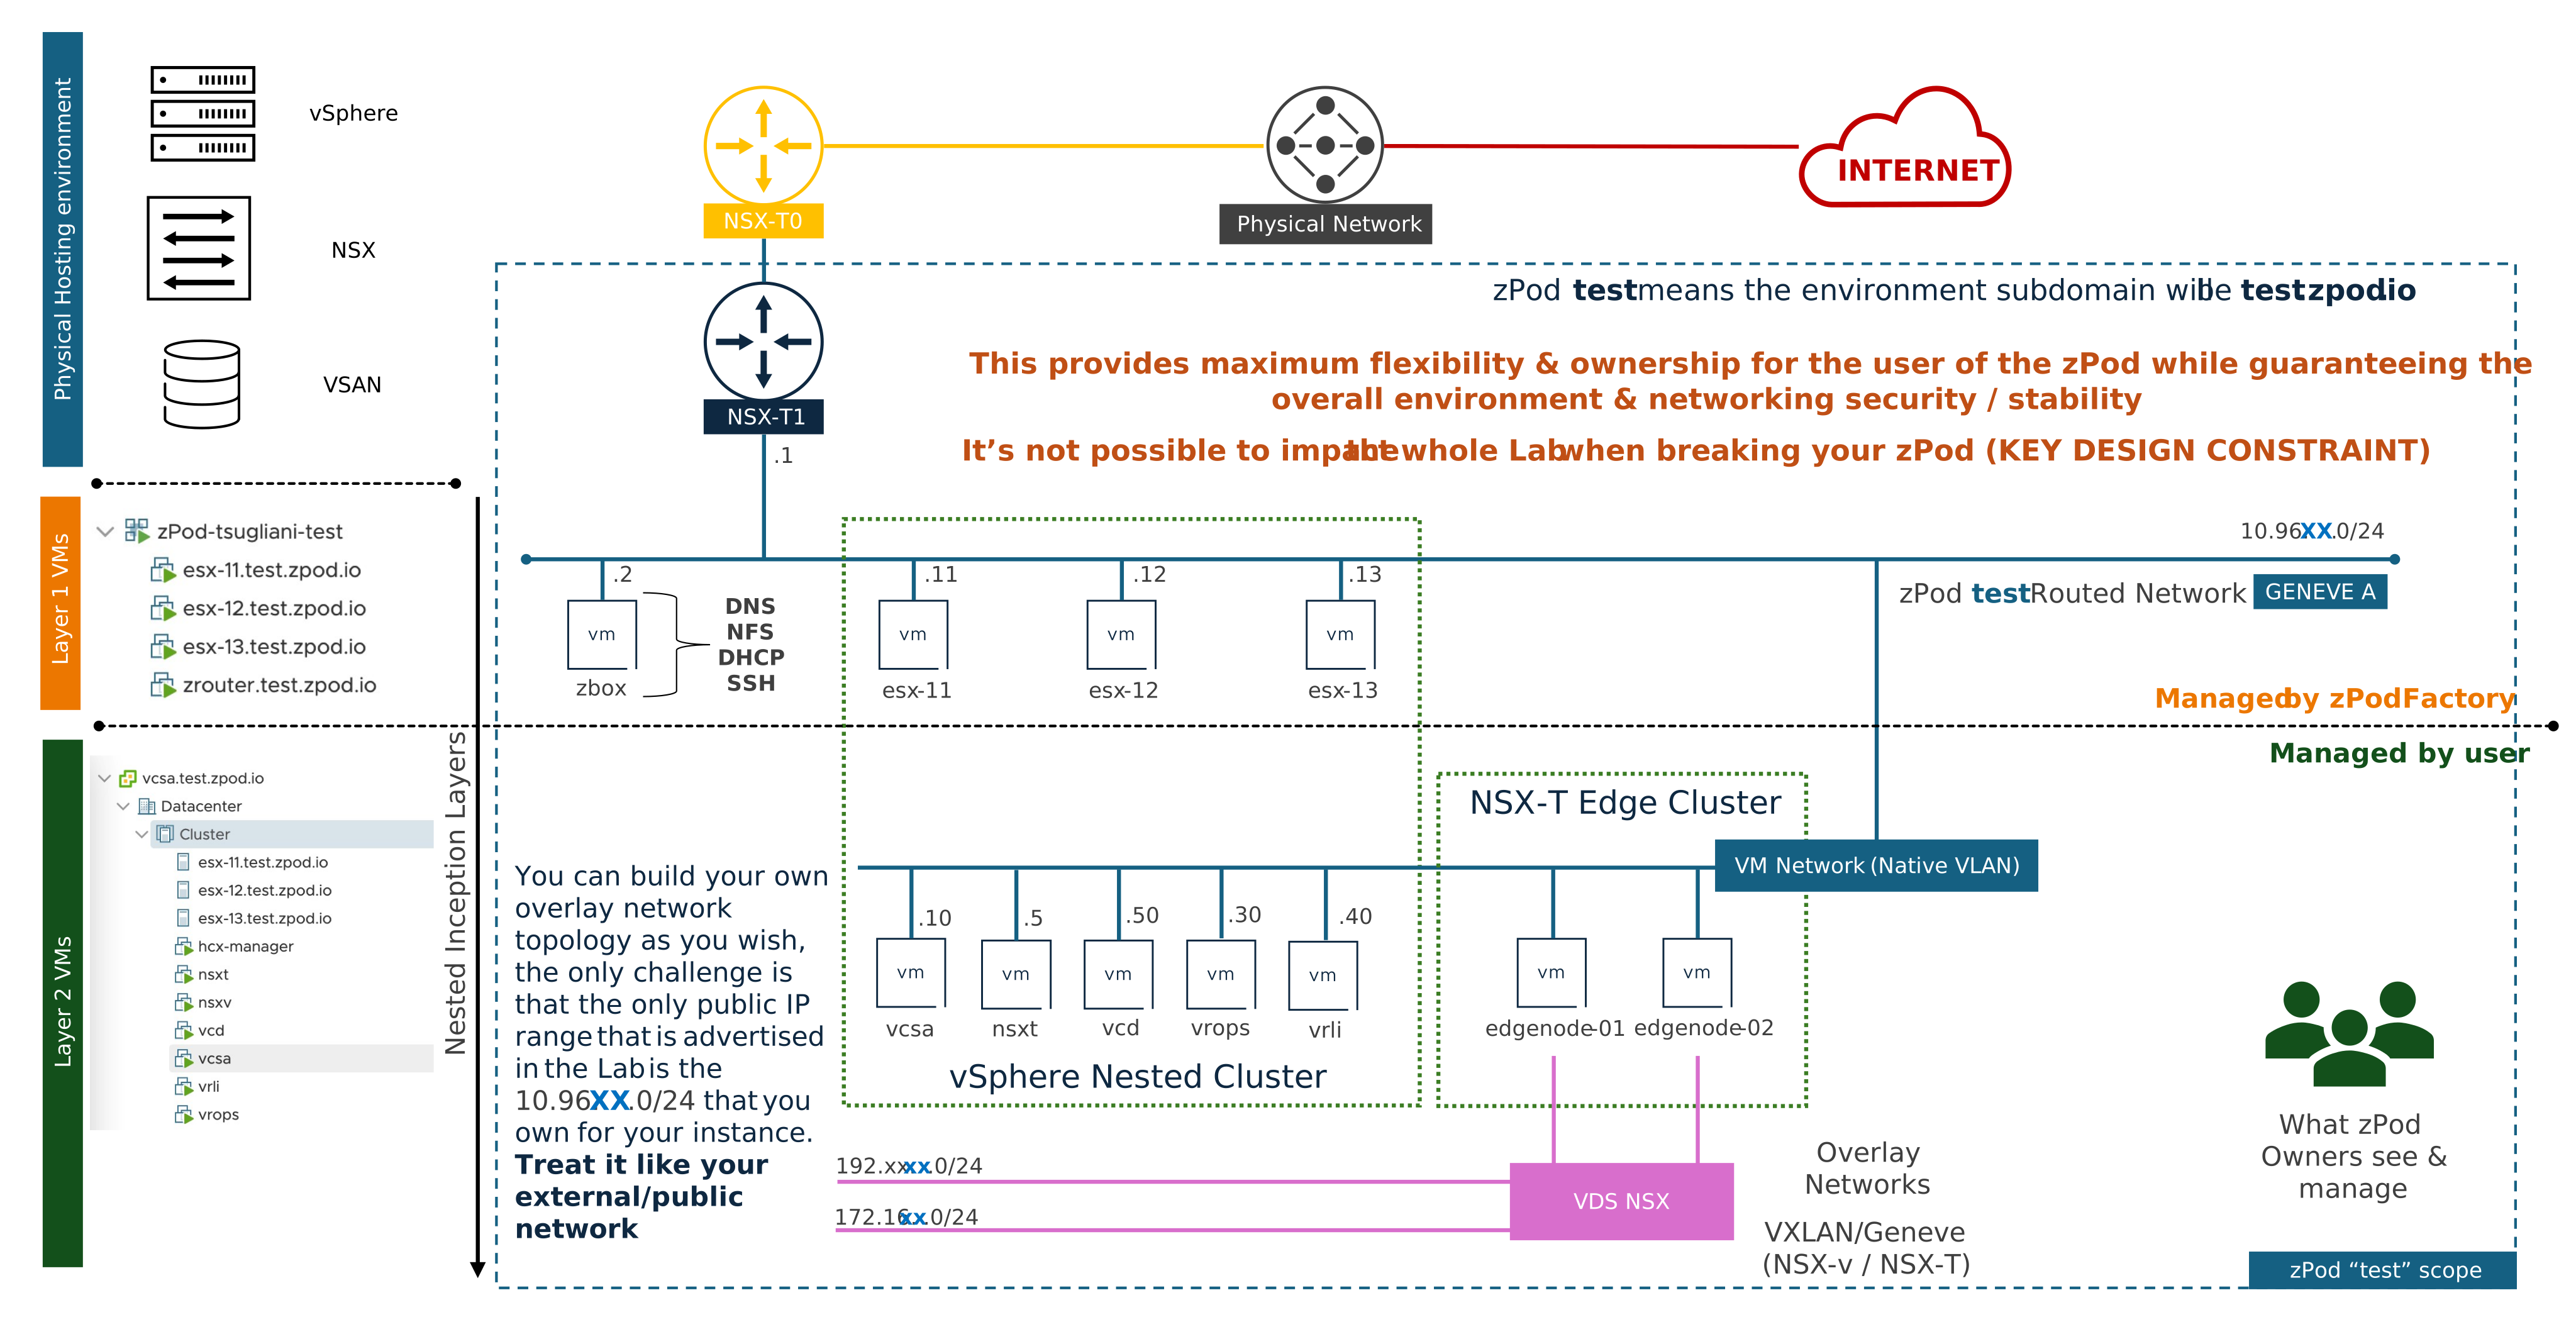
- Top left in Blue you can see the physical environment used to host the nested environments (zPods). This is basically the
endpointin the zPodFactory framework. I've also depicted on the center part, how the "global" NSX configuration would look like from a simple deployment (single endpoint)
Info
You can check the endpoint section for more information on how to configure an endpoints here: Manage endpoints
-
Center Left in Orange, you can see the nested environment from an administrator perspective, basically all the Layer 1 VMs. You can see the main components that are deployed at L1 which are the
zcore(mandatory core appliance; legacy zPods may still showzbox) and theesxicomponents. The core component manages DNS/DHCP, NFS storage, and routing for the guest VLAN subnets. Theesxicomponents are the nested environment hosts. The main important part here is the zPod Network, which is managed by an admin, and protects every nested environment from each other and also the physical environment. -
Bottom left in Green shows what a User can see from his POV, he will never see the 2 above layers, unless he is a zPodFactory administrator, but he will see/access the nested environment from his perspective, which is usually the vCenter Server, and the components in it and have full control over those components as the zPod password is admin for every component in that nested environment. In the Center part, you could see what a User would potentially build in the nested environment, which is usually a vCenter Server, a NSX-T Manager, a NSX-T overlay network on top of the zPod Network and then VMs connected to that overlay network.
Network High Level Diagram
Now from a more detailed networking perspective that shows 2 main NSX capabilities:
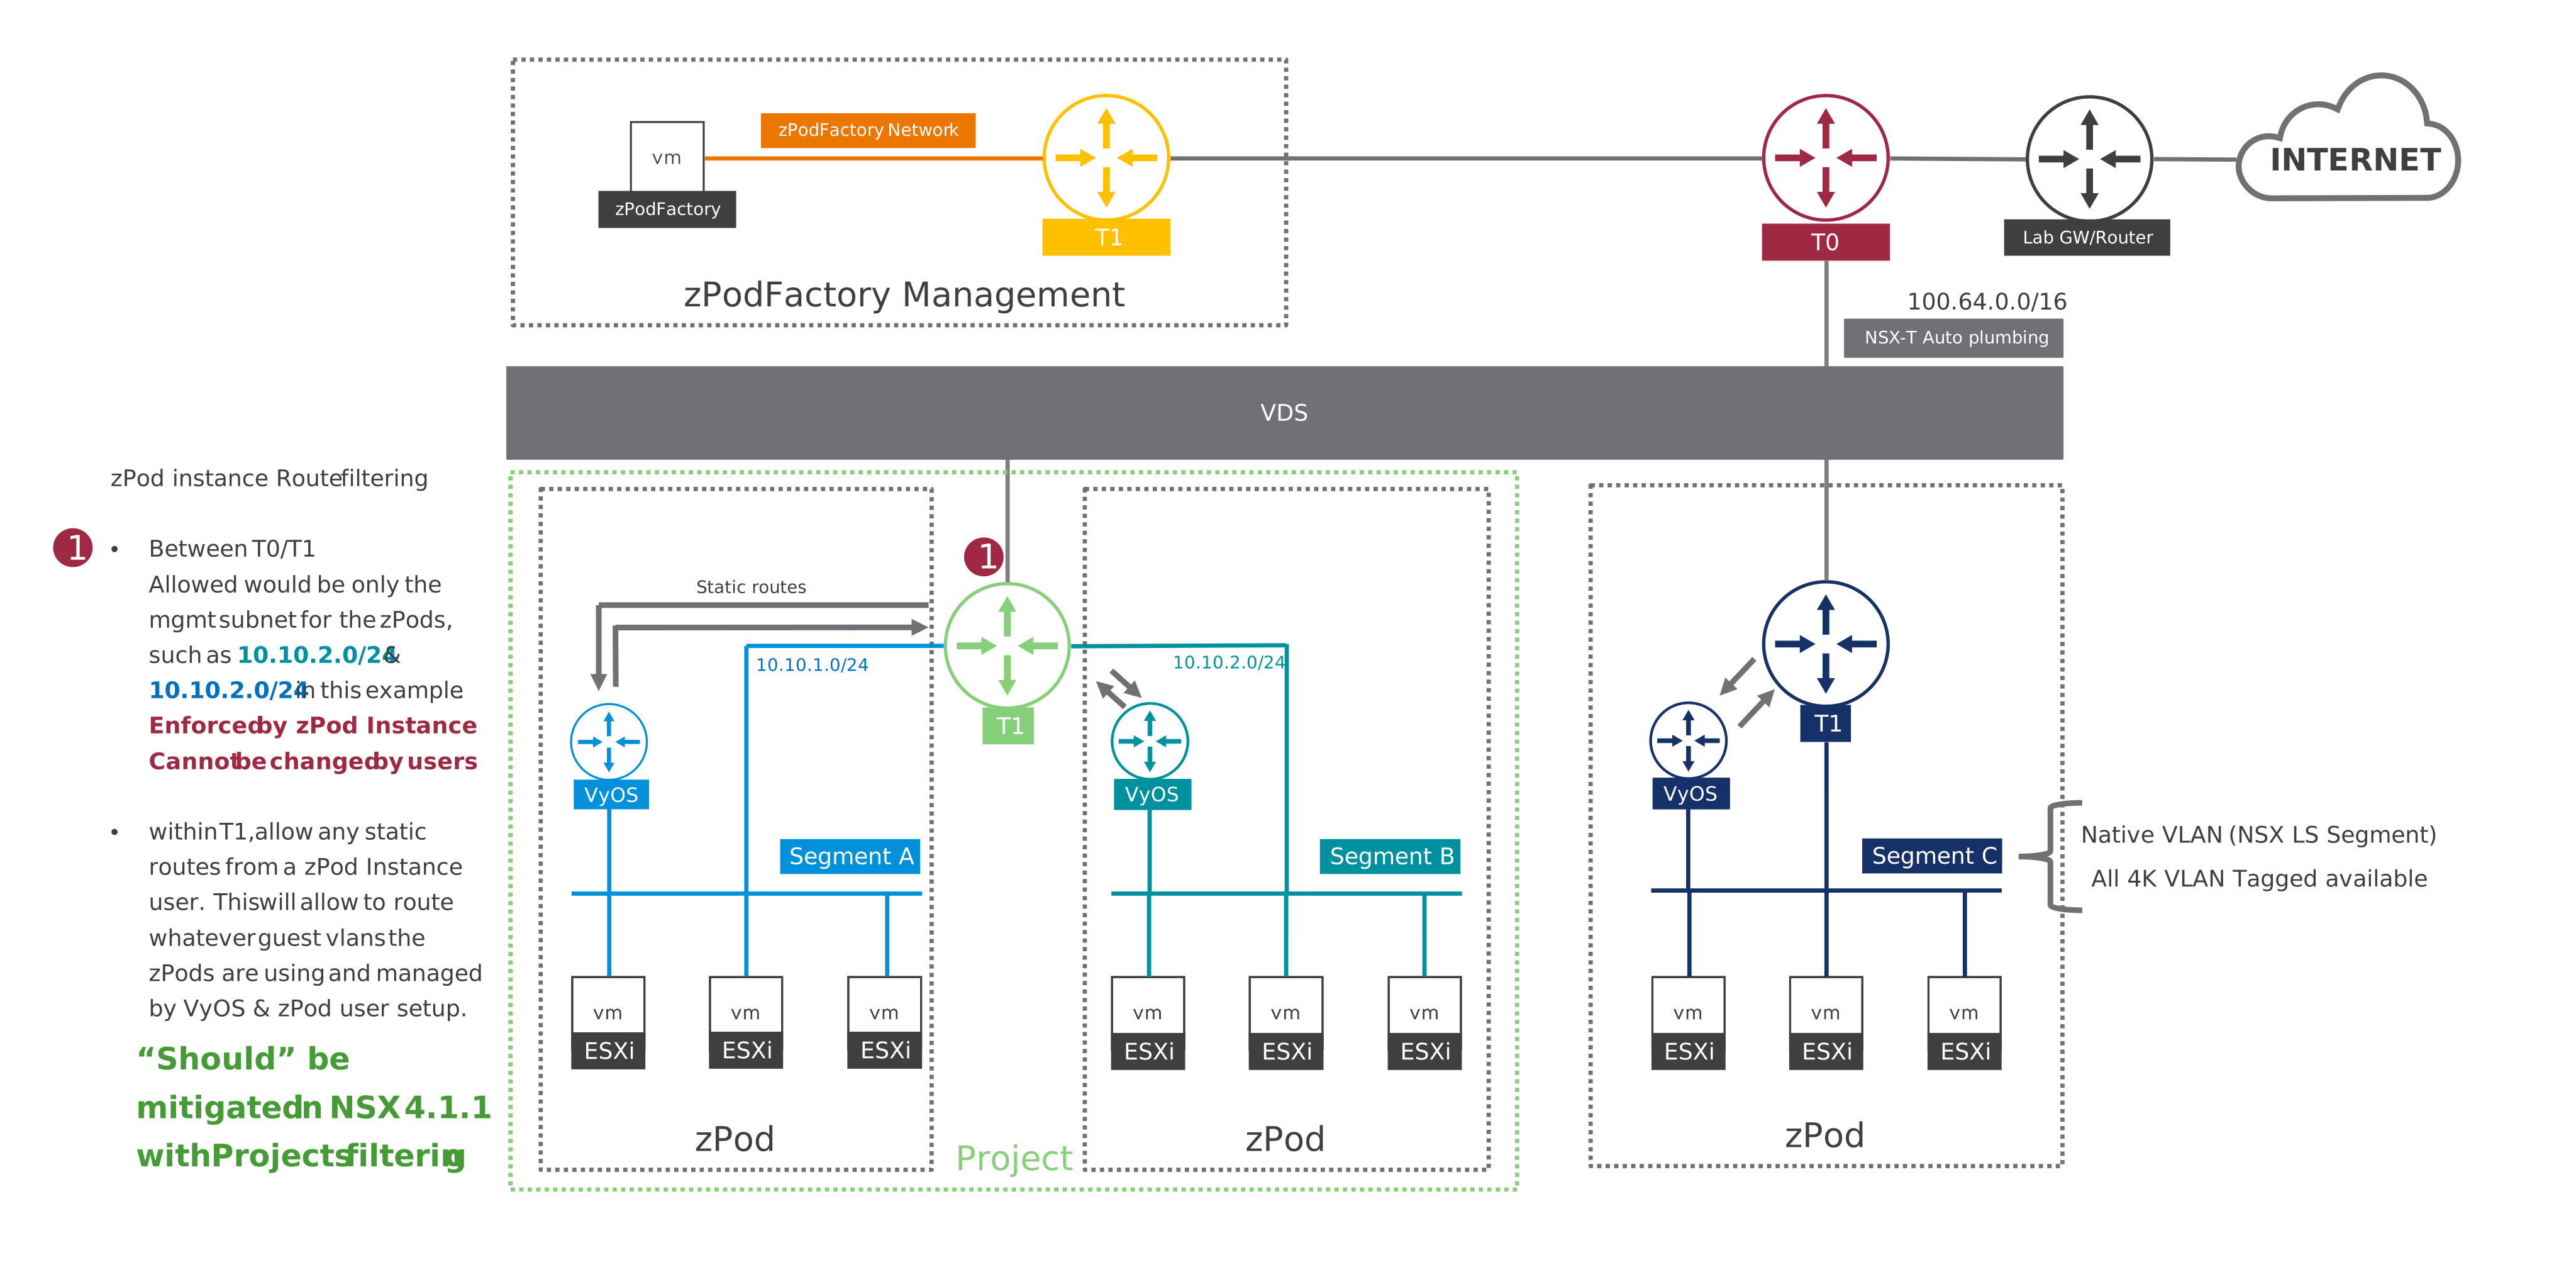
Depending on which NSX version you have installed at the physical layer, you may be able to use the recent NSX Projects feature, which aims to build multi-tenancy in the NSX environment.
- On the bottom left side you can see a Project construct that encompasses 1 or more zPods (2 in this example)
- On the bottom right side you can see a zPod not using Projects at all.
Warning
To leverage NSX Projects you will need to use NSX 4.1.1 or above for full support.
Using NSX Projects are highly recommended as they provide a lot of benefits around the permissions that we can provide on the networking layer of the nested environments. This gives users a lot of flexibility (creating VLANs/subnets, and routing them without any administrator interaction), and also to provide security for admins who can filter the routes being advertised from the zPod Network T1 Connected Segment to the main T0 of the physical environment.
Once the zPodFactory framework is deployed and running, you can start using the CLI to configure and manage the framework.
Nested Networking Diagram
This is what a user will be able to use/leverage on any nested zPod he deploys.
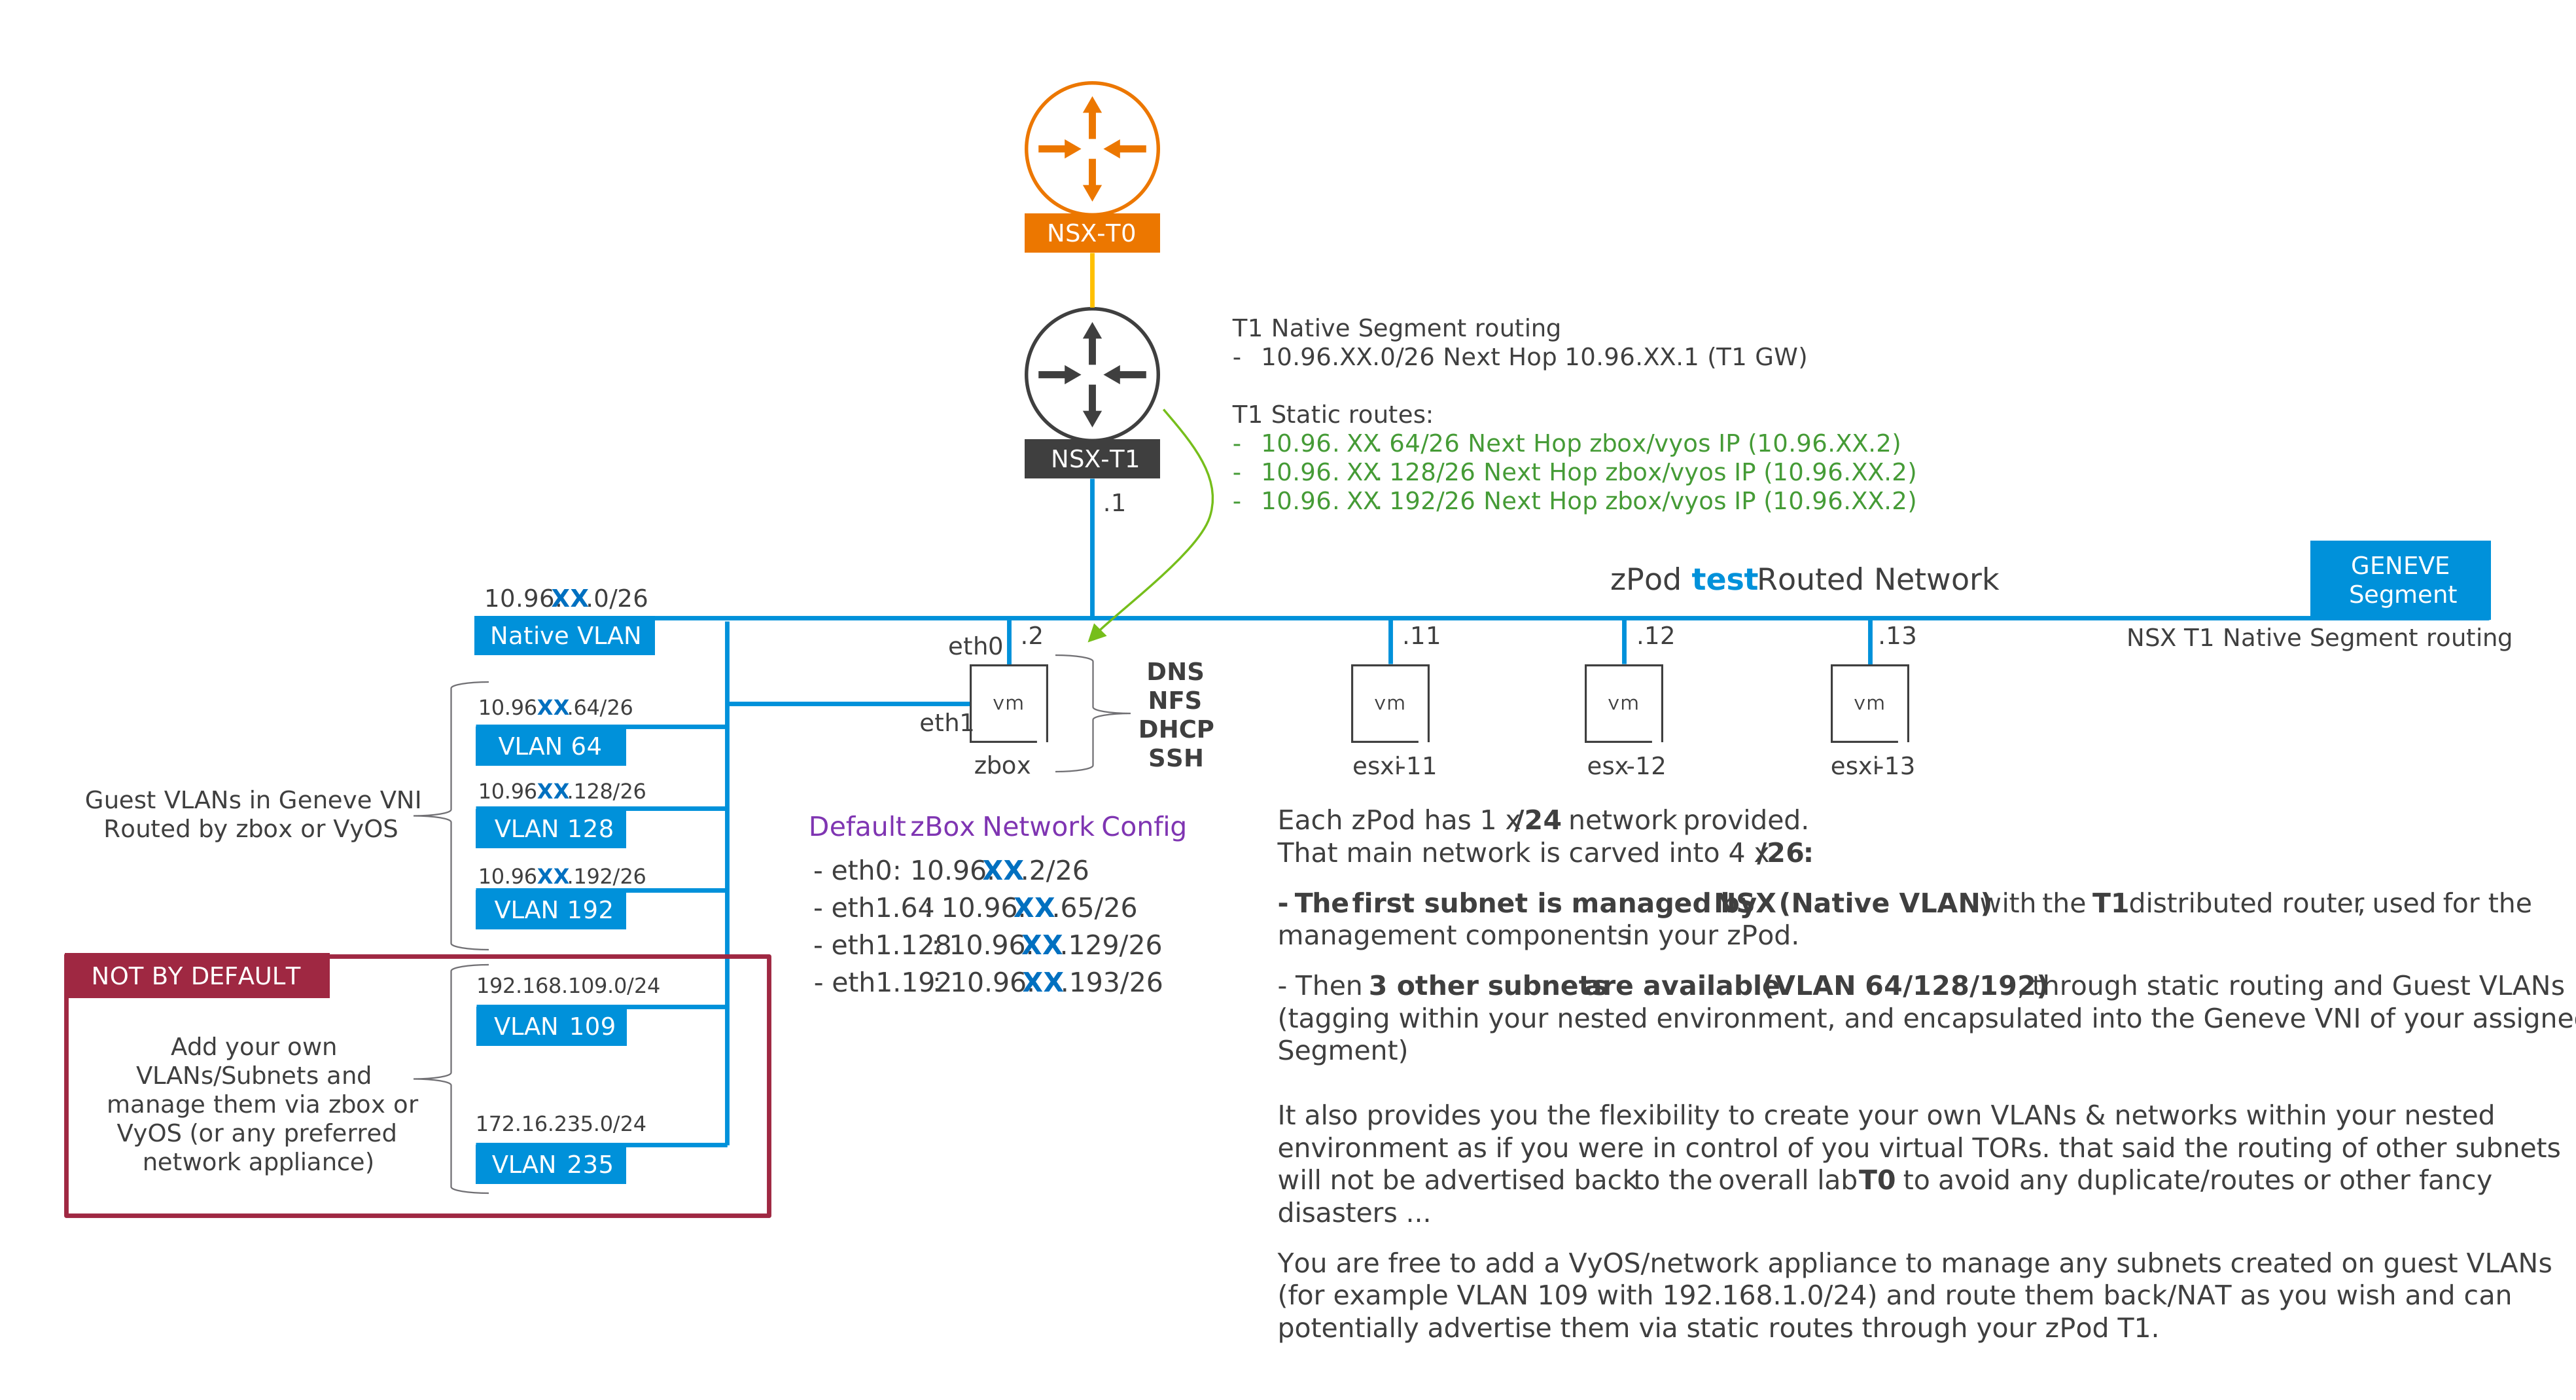
Each zPod has 1 overall network (1 x /24 subnet that we carve into 4 x /26)
Example: zPod "test" has 10.96.10.0/24
We will have the following networks managed:
- Subnet
10.96.10.0/26(Native VLAN, untagged, Management VLAN for components deployed): This Subnet is managed and routed by NSX T1. - Subnet
10.96.10.64.0/26(VLAN 64, tagged): This subnet is by default routed by thezcorecomponent (legacy zPods may usezbox), but we will offer the ability to change the routing to avyoscomponent in the future - Subnet
10.96.10.128.0/26(VLAN 128, tagged): This subnet is by default routed by thezcorecomponent, but we will offer the ability to change the routing to avyoscomponent in the future - Subnet
10.96.10.192.0/26(VLAN 192, tagged): This subnet is by default routed by thezcorecomponent, but we will offer the ability to change the routing to avyoscomponent in the future
Those VLANs should simplify the initial deployment and configuration of NSX in the nested layer so you can setup Host/Edge Nodes TEPs/Public subnets on different VLANs as you see fit.
Info
This does not mean you cannot add any new VLANs, those are just the default networks/VLANs configured that are configured AND advertised upstream through the T0.
As you can imagine, we need to avoid advertising any non-managed networks upstream or 2 users could for example try to advertise back the same subnet such as 192.168.1.0/24 and this would bring many issues we want to avoid.
PS: When using NSX Projects you can have control on the T1 of your zPod to add any static routes as you see fit, meaning you could for example add VLAN 100 with the subnet 192.168.1.0/24 and it will be ONLY be available on your zPod. As you can imagine if you add a subnet, you'll need to route that subnet to a next hop that you have to manage yourself using zcore, vyos, or NSX if this is an overlay networking sitting on Geneve for example.
Introduction
zcli is a command line tool that allows you to manage your zPods and the whole zPodFactory framework.
CLI Installation
Using pip:
Verify that the CLI is now available and working:
❯ zcli

 Usage: zcli [OPTIONS] COMMAND [ARGS]...

╭─ Options ───────────────────────────────────────────────────────────────────╮
│ --factory             -f      TEXT  Use specific factory for this commmand. │
│ --output-svg                        Output an SVG file for any list command.│
│ --version             -V            Display version information.            │
│ --install-completion                Install completion for this shell.      │
│ --help                              Show this message and exit.             │
╰─────────────────────────────────────────────────────────────────────────────╯
╭─ Commands ──────────────────────────────────────────────────────────────────╮
│ component                          Manage Components                        │
│ endpoint                           Manage Endpoints                         │
│ enet                               Manage ENets                             │
│ factory                            Manage Factories                         │
│ group                              Manage Permission Groups                 │
│ library                            Manage Libraries                         │
│ profile                            Manage Profiles                          │
│ setting                            Manage Settings                          │
│ user                               Manage Users                             │
│ zpod                               Manage zPods                             │
╰─────────────────────────────────────────────────────────────────────────────╯
Authentication
The first thing you need to do is to connect to the zPodFactory API as an administrator which is called superuser which has superadmin privileges.
superadmin is a special role that has ALL the permissions in the zPodFactory framework.
This user has the ability to do everything in the zPodFactory framework.
First thing is to connect to the server with the superuser token provided. (This is done automatically within the zPodFactory appliance)
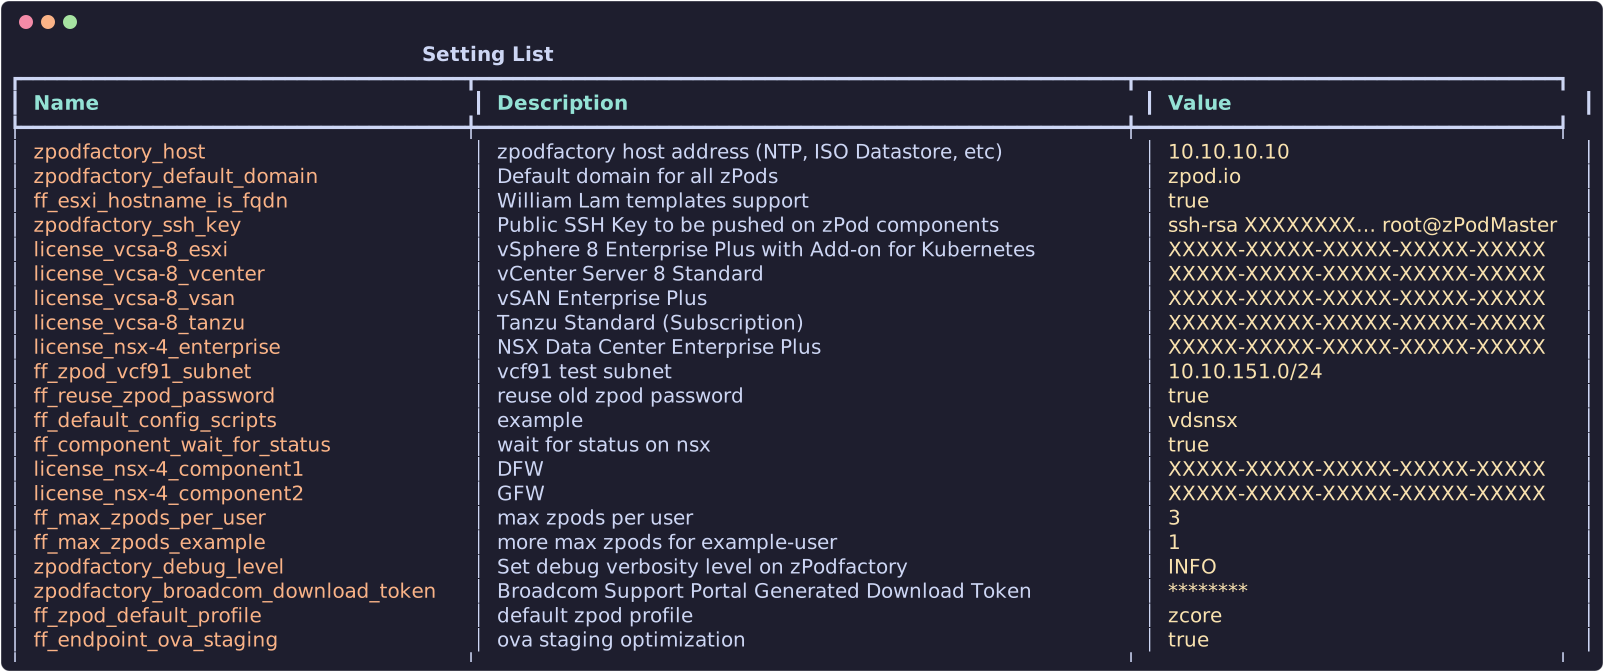
Manage settings
This is the main entry point to configure the framework, which requires very important information to be able to operate correctly.
In the manual installation guide, we provided an example deploy.sh script to help setup those settings correctly, but we will explain every relevant one here:
zpodfactory_host: IP of the VM where zPodFactory runs (used for NTP, ISO datastore paths, etc.).zpodfactory_default_domain: Base domain name for each deployed zPod (e.g. zPodtest→test.zpodfactory.domain).zpodfactory_ssh_key: SSH public key pushed to zPod components (zcore,esxi, etc.) for SSH access.zpodfactory_broadcom_download_token: Per-customer download token from the Broadcom Support Portal used by the download engine for VMware product binaries. See Broadcom download token for how to obtain and configure it.zpodfactory_debug_level: Runtime log verbosity (INFOorDEBUG). Changes take effect without restart.zpodfactory_fqdn_reserved_chars: Safety margin (default8) under the 64-character Linux hostname limit used to reject zPod component FQDNs that are too long at creation time.
Download engine
The legacy zpodfactory_customerconnect_username / zpodfactory_customerconnect_password settings are no longer used. VMware product downloads go through the Broadcom depot with zpodfactory_broadcom_download_token.
If the token is missing or invalid, component enable/download will fail with a 401/403. You can still use zcli component upload to provide OVA files manually.
license_<component>-<version>: Auto-apply licenses after component deploy. Supports vCenter and NSX license keys (multiple NSX keys can be configured).
See Settings & feature flags for the full reference: every core zpodfactory_* setting with its seeded default, plus the optional ff_* flags that control zPod creation, networking, deployment, and destroy behavior.
Manage users
List users:

user list includes an API Token column: superadmins see every user's token, a user sees their own, and every other row is masked (—). Add -j/--json for machine-readable output (combine with --no-color to strip Rich styling), e.g. zcli user list --json --no-color.
Create, update, enable/disable, or reset API tokens:
zcli user add <username> --email user@example.com
zcli user update <username> --email new@example.com
zcli user enable <username>
zcli user disable <username>
zcli user reset_api_token <username>
Use zcli user list --all to include disabled users.
Manage groups
Permission groups bundle users for zPod and endpoint access:
zcli group list
zcli group create <name> -d "Description"
zcli group update <name> -d "New description"
zcli group delete <name>
zcli group user add <group> <username>
zcli group user remove <group> <username>
Manage permissions
zPodFactory supports RBAC on zPods and endpoints with three permission levels:
| Level | Capabilities |
|---|---|
OWNER |
Full control including destroy and permission management |
ADMIN |
Maintain zPod (components, DNS, permissions); superadmins receive a virtual ADMIN on all zPods |
USER |
Read access (components, DNS, networks) |
zPod permissions
zcli zpod permission list <zpod_name>
zcli zpod permission add <zpod_name> --user alice --permission OWNER
zcli zpod permission add <zpod_name> --group lab-admins --permission USER
zcli zpod permission remove <zpod_name> --user alice --permission OWNER
Last maintainer guard
You cannot remove the last OWNER/ADMIN from a zPod — doing so would orphan it. Reassign ownership first, or use a superadmin account.
The API also exposes GET /zpods/{id}/permissions/mine for UIs to discover the caller's effective permission level.
Endpoint permissions
zcli endpoint permission list <endpoint_name>
zcli endpoint permission add <endpoint_name> --user alice --permission OWNER
zcli endpoint permission remove <endpoint_name> --group lab-admins --permission USER
Manage library
By default zPodFactory comes with a default library that contains all the "official" vmware and misc supported components supported by the framework.
This library is stored in a git repository and is cloned locally, and used to fetch all components metadata (mainly the OVA binary files with some misc information) we use to manage the products.
Listing libraries:

PS: The
defaultlibrary is the only one available for now, but the framework is designed to be able to support multiple libraries.
Resync the library:
PS: The
resynccommand will refresh all thecomponentsmetadata from the git repository, and will update the local database with the new information.
Manage components
Most administrators use the Components page in zpodweb — a searchable, filterable catalog where you can enable or disable components, watch download progress, and upload OVA/ISO files via file picker. The CLI commands below call the same zPod API.
Enabling a component triggers the embedded download engine. Configure zpodfactory_broadcom_download_token first for VMware products from the Broadcom depot — set it under Settings in the Web UI, or via CLI (see Broadcom download token). When depot download is not possible, use Upload in the Web UI or zcli component upload for manual OVA provisioning.
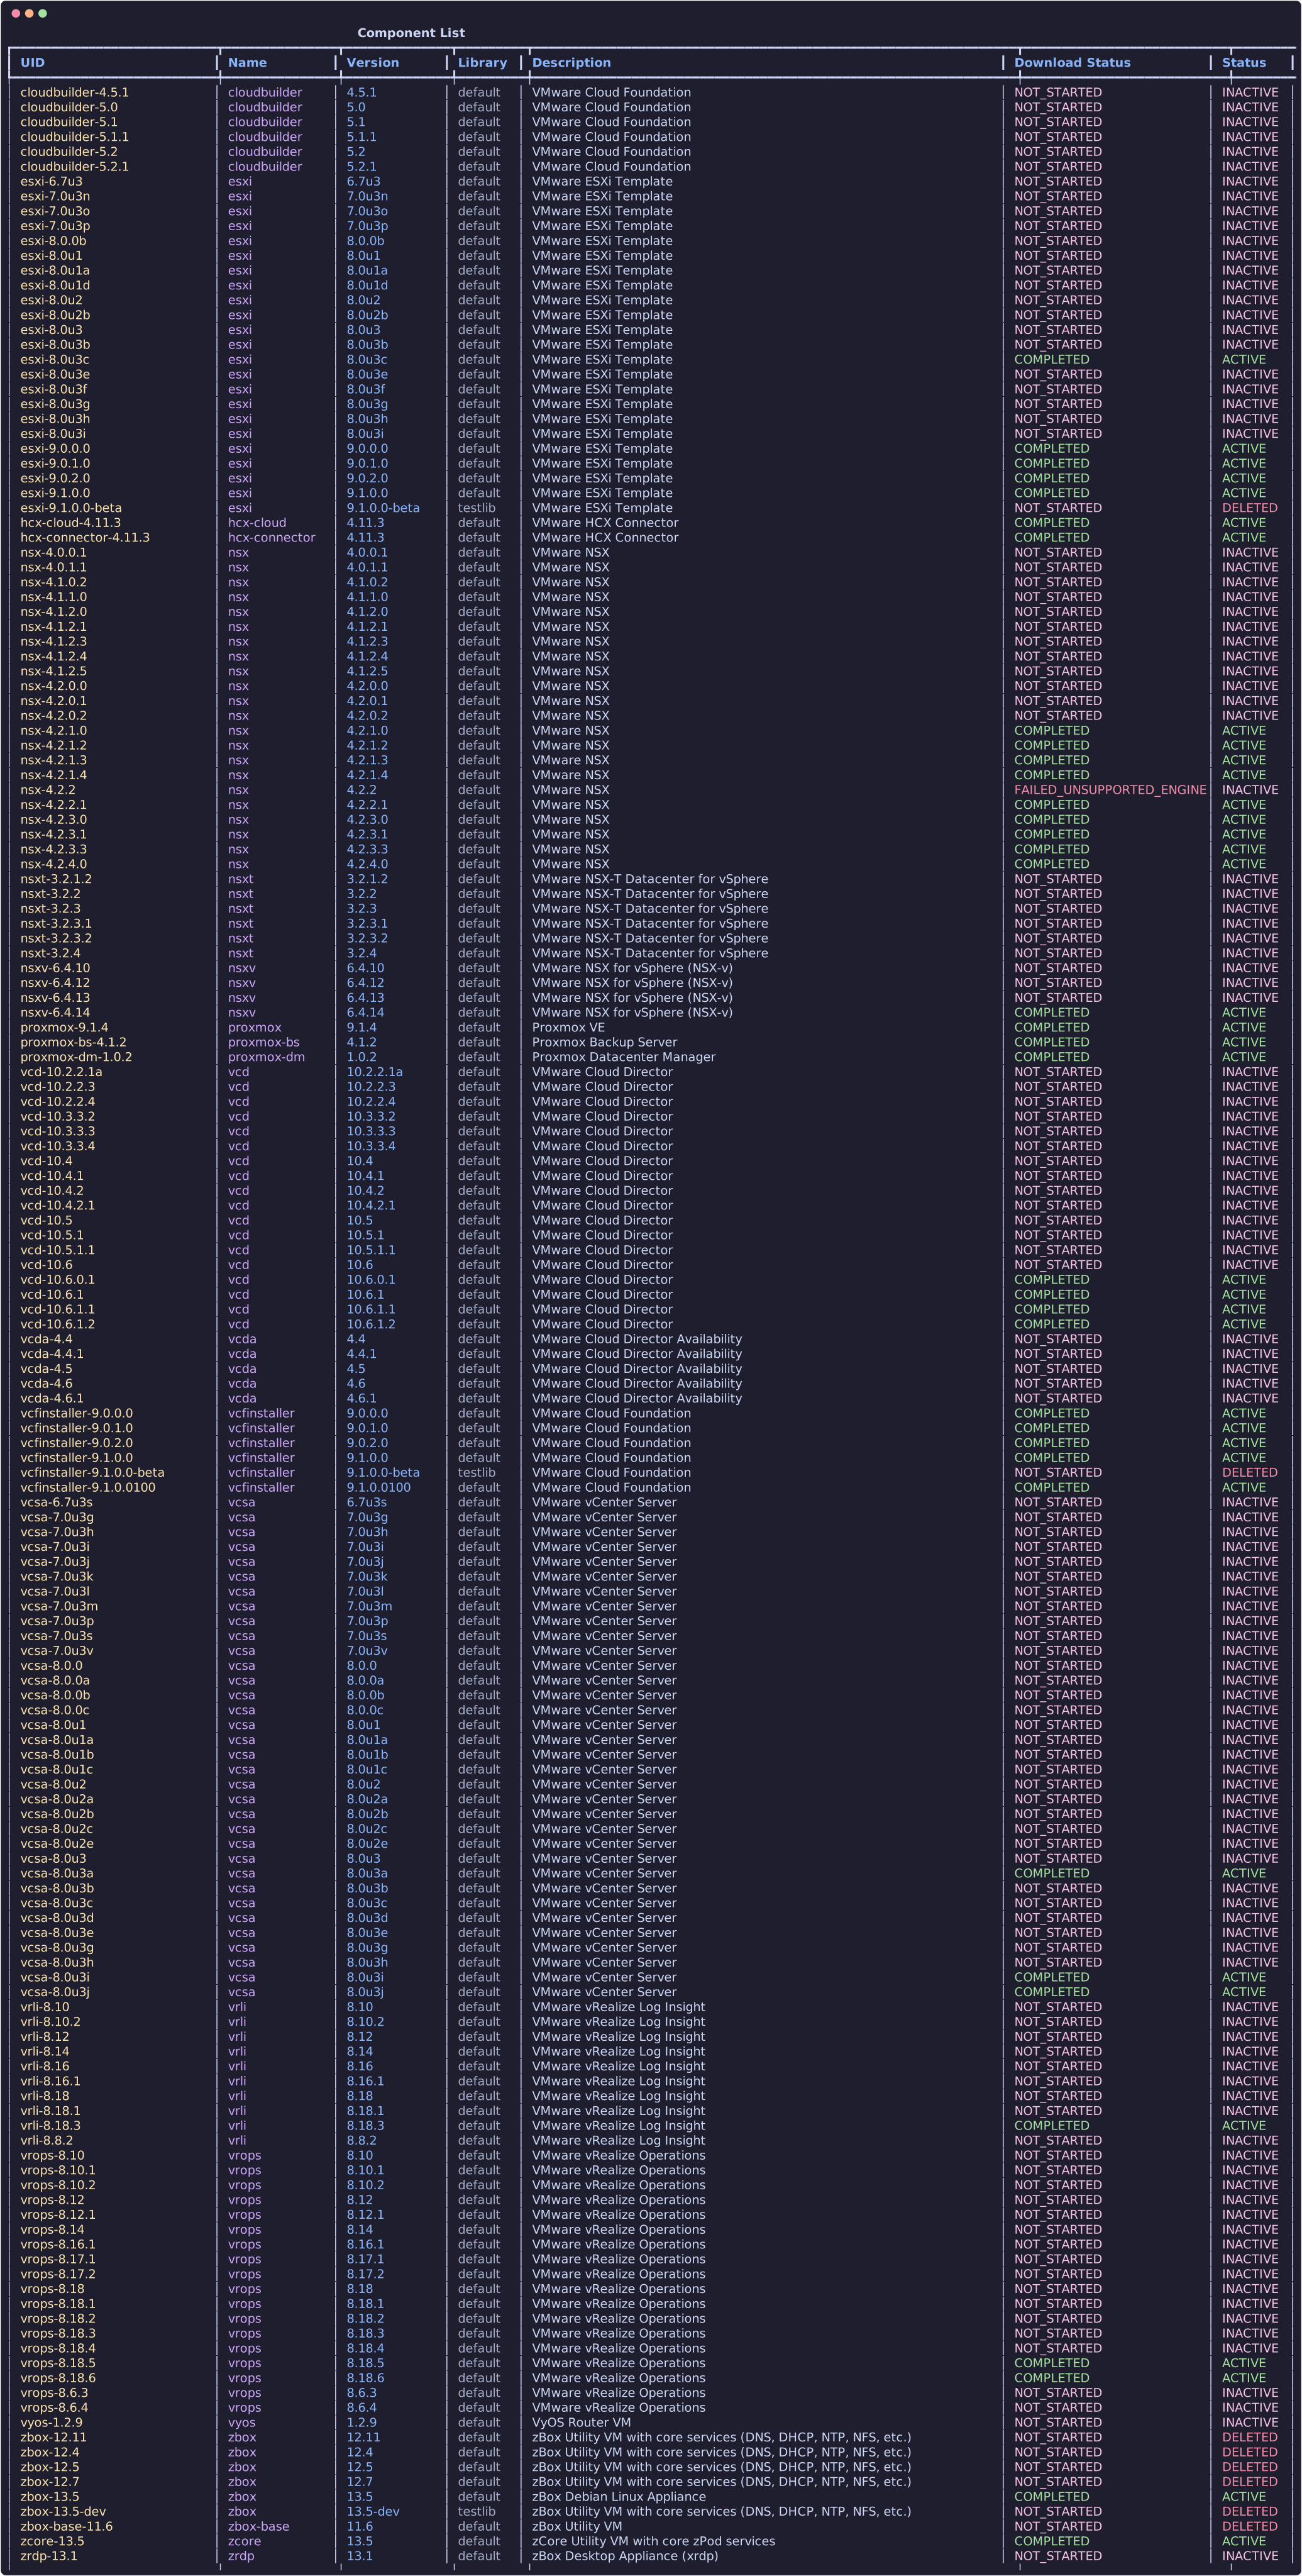
List all components:
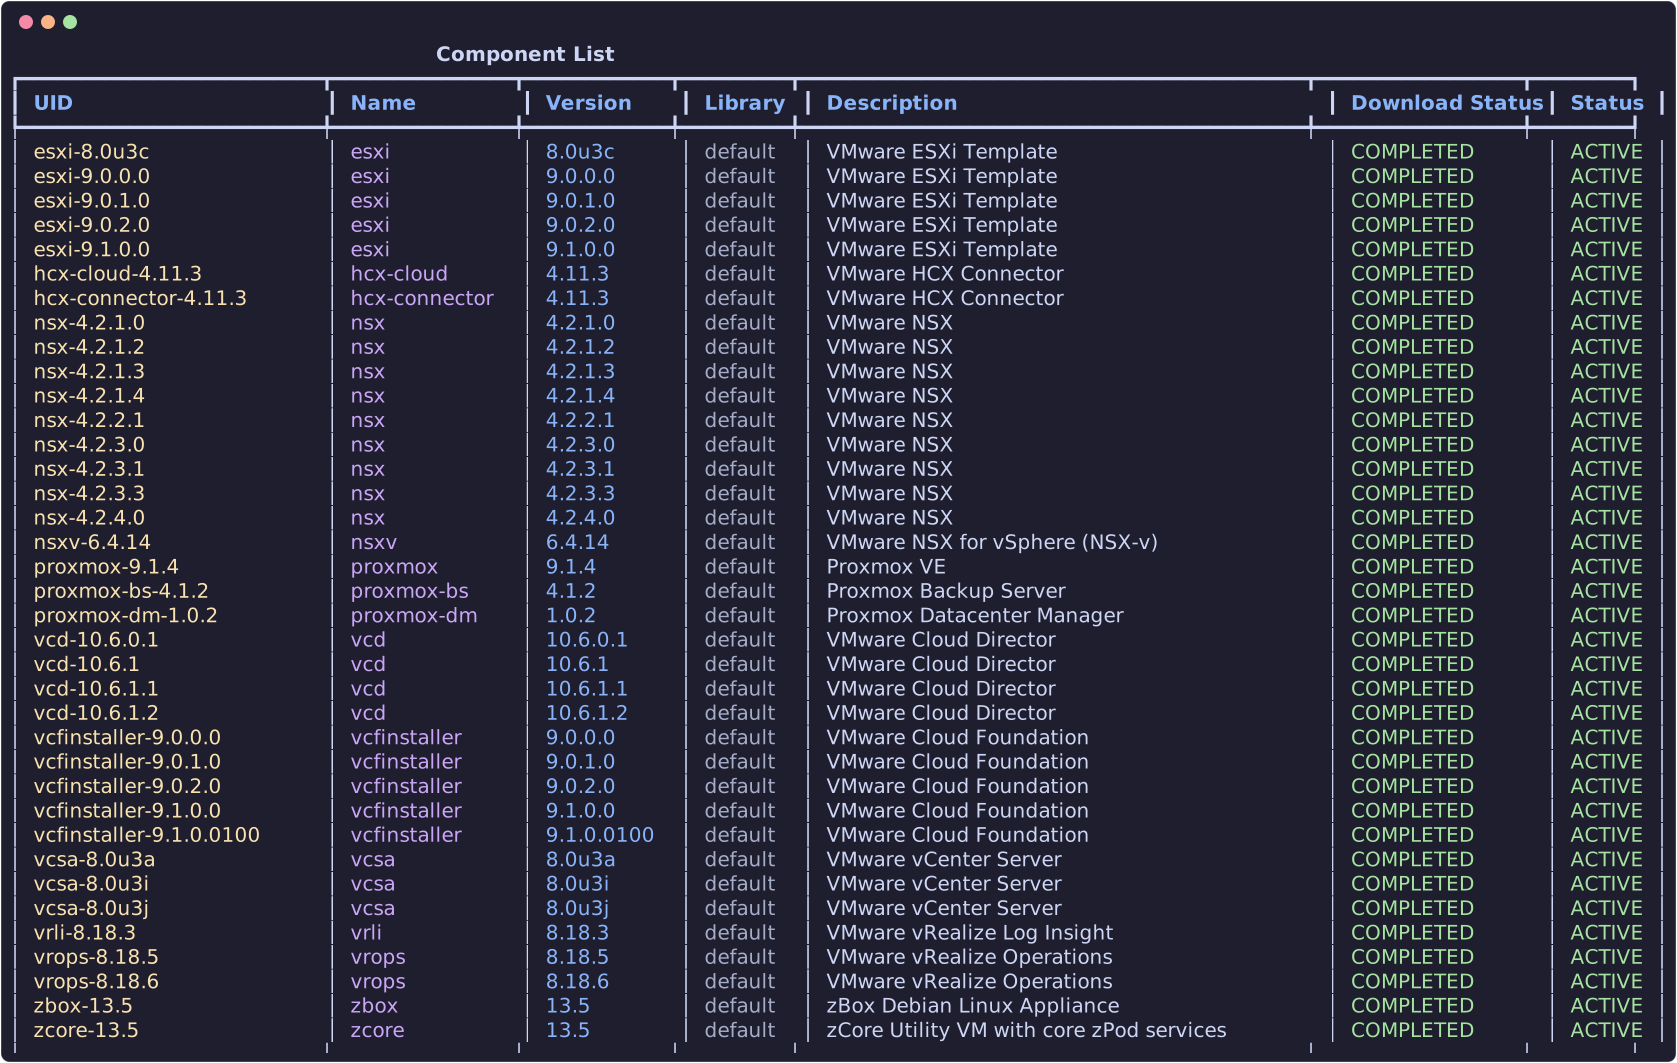
List all available components (ready to deploy):
Enable a component (make it available for deployment):
In zpodweb, open Components, find the component, and click Enable — the same download flow runs as the CLI command below.
Download engines
The download engine supports the https engine only (direct wget from URLs in the library). VMware product URLs use the Broadcom offline depot layout with a ${BROADCOM_DOWNLOAD_TOKEN} placeholder substituted at runtime.
Non-VMware components (such as zcore) may use direct HTTPS URLs. The upload feature remains available as a fallback — checksum verification matches the file against library metadata and enables the correct component automatically.
You will need to use the component UID (unique name of the component, as depicted in the list command above)
Disable a component (removes the product file from disk):
Upload a component to zPodFactory:
In zpodweb, use Components → Upload to select an OVA or ISO file from your workstation.
You can follow progress in zpodweb (Components list shows download percentage and status), with zcli component list, or inspect a specific component:
JSON output is available on list/get commands with -j / --json for automation.
Manage endpoints
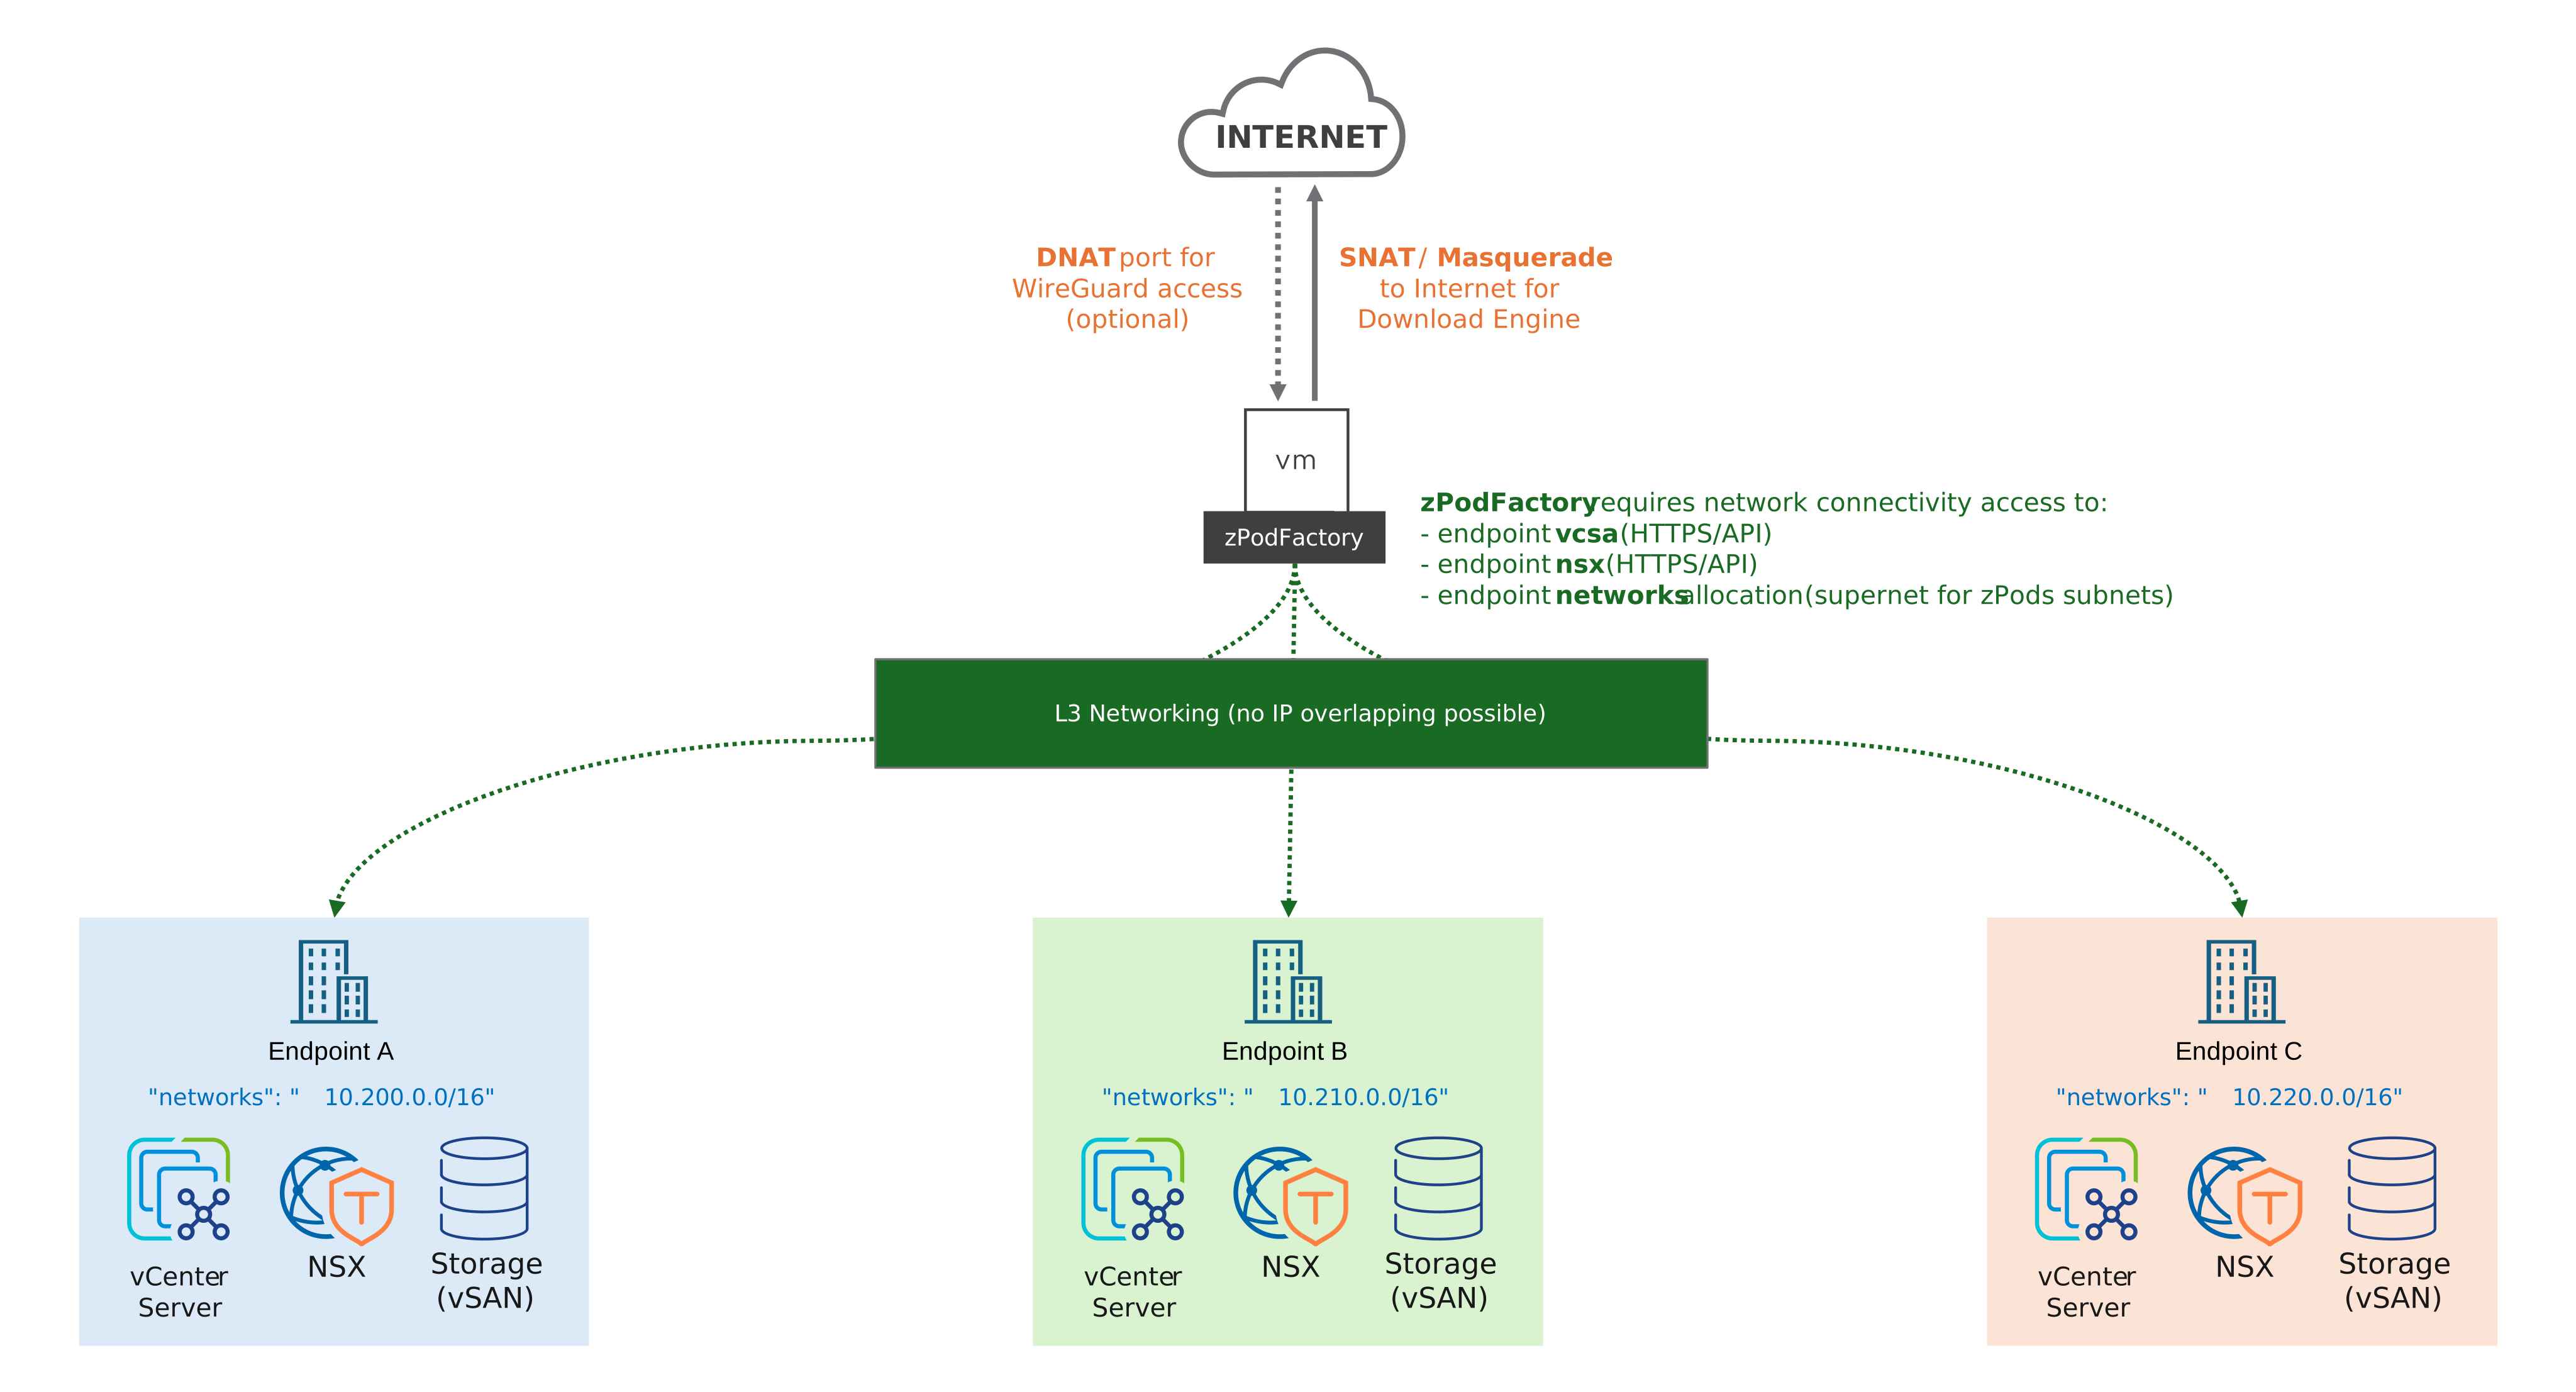
Endpoints are the target physical environments a nested environment will be built upon.
The framework is designed to be able to support multiple endpoints, and to be able to deploy nested environments on different physical environments.
Warning
Network connectivity from the zPodFactory Appliance to the following is MANDATORY:
- VMware vCenter Server (HTTPS API)
- VMware ESXi Hosts (OVF/OVA uploads)
- VMware NSX-T Manager (HTTPS API)
- VMware NSX-T
networkssupernet L3 connectivity
List all endpoints:

Create an endpoint:
❯ zcli endpoint create

 Usage: zcli endpoint create [OPTIONS] ENDPOINT_NAME

 Endpoint Create

╭─ Arguments ──────────────────────────────────────────────────────────╮
│ *    endpoint_name      TEXT  Endpoint name [required]               │
╰──────────────────────────────────────────────────────────────────────╯
╭─ Options ────────────────────────────────────────────────────────────╮
│ --description     -d       TEXT  Description                         │
│ --endpoints       -e       TEXT  Endpoints json                      │
│ --endpoints-file  -ef      PATH  File containing endpoints json      │
│ --help                           Show this message and exit.         │
╰──────────────────────────────────────────────────────────────────────╯
If you just want to create a simple endpoint, you can use the interactive command or generate a sample JSON file:
This writes testendpoint-sample.json that you can edit and pass back with --endpoints-file.
Interactive creation:
❯ zcli endpoint create testendpoint

Compute Endpoint
driver [vsphere] (vsphere):
hostname: vcenter.fqdn.lab
username: zpodserviceuser@fqdn.lab
password: ********
datacenter: Datacenter-Paris
resource_pool: Cluster-SDDC
storage_datastore: vsanDatastore
vmfolder: zPods-Paris
vds: vds-Paris

Network Endpoint
driver [nsxt/nsxt_projects] (nsxt_projects):
hostname: nsx.fqdn.lab
username (admin):
password: ********
networks: 10.130.0.0/16
transportzone: default-tz-overlay
edgecluster: edgeclustername
t0: T0-Lab
Endpoint testendpoint has been created.
This will allow for interactive creation of an endpoint and prompt for all the required information.
Compute vds field
vds names the vSphere Distributed Switch backing the endpoint's portgroups. Set it when clusters on the same vCenter share an NSX-T overlay transport zone across different VDS's — otherwise govc import.ova can't tell apart the identically-named zPod segment portgroup created on each VDS. Leave it blank (default) for single-VDS environments; existing endpoints keep working unchanged until you set it. There is no dedicated zcli endpoint update --vds flag yet — set or change it via PATCH /endpoints/{id} with {"endpoints": {"compute": {"vds": "<name>"}}}, or by re-running endpoint create --endpoints-file with an updated sample.
Inspect or export an endpoint:
zcli endpoint info <endpoint_name>
zcli endpoint info <endpoint_name> -j    # JSON
zcli endpoint update <endpoint_name> ...
zcli endpoint delete <endpoint_name>
ENets
ENets (endpoint networks) are superadmin-only constructs for advanced endpoint networking:
Manage profiles
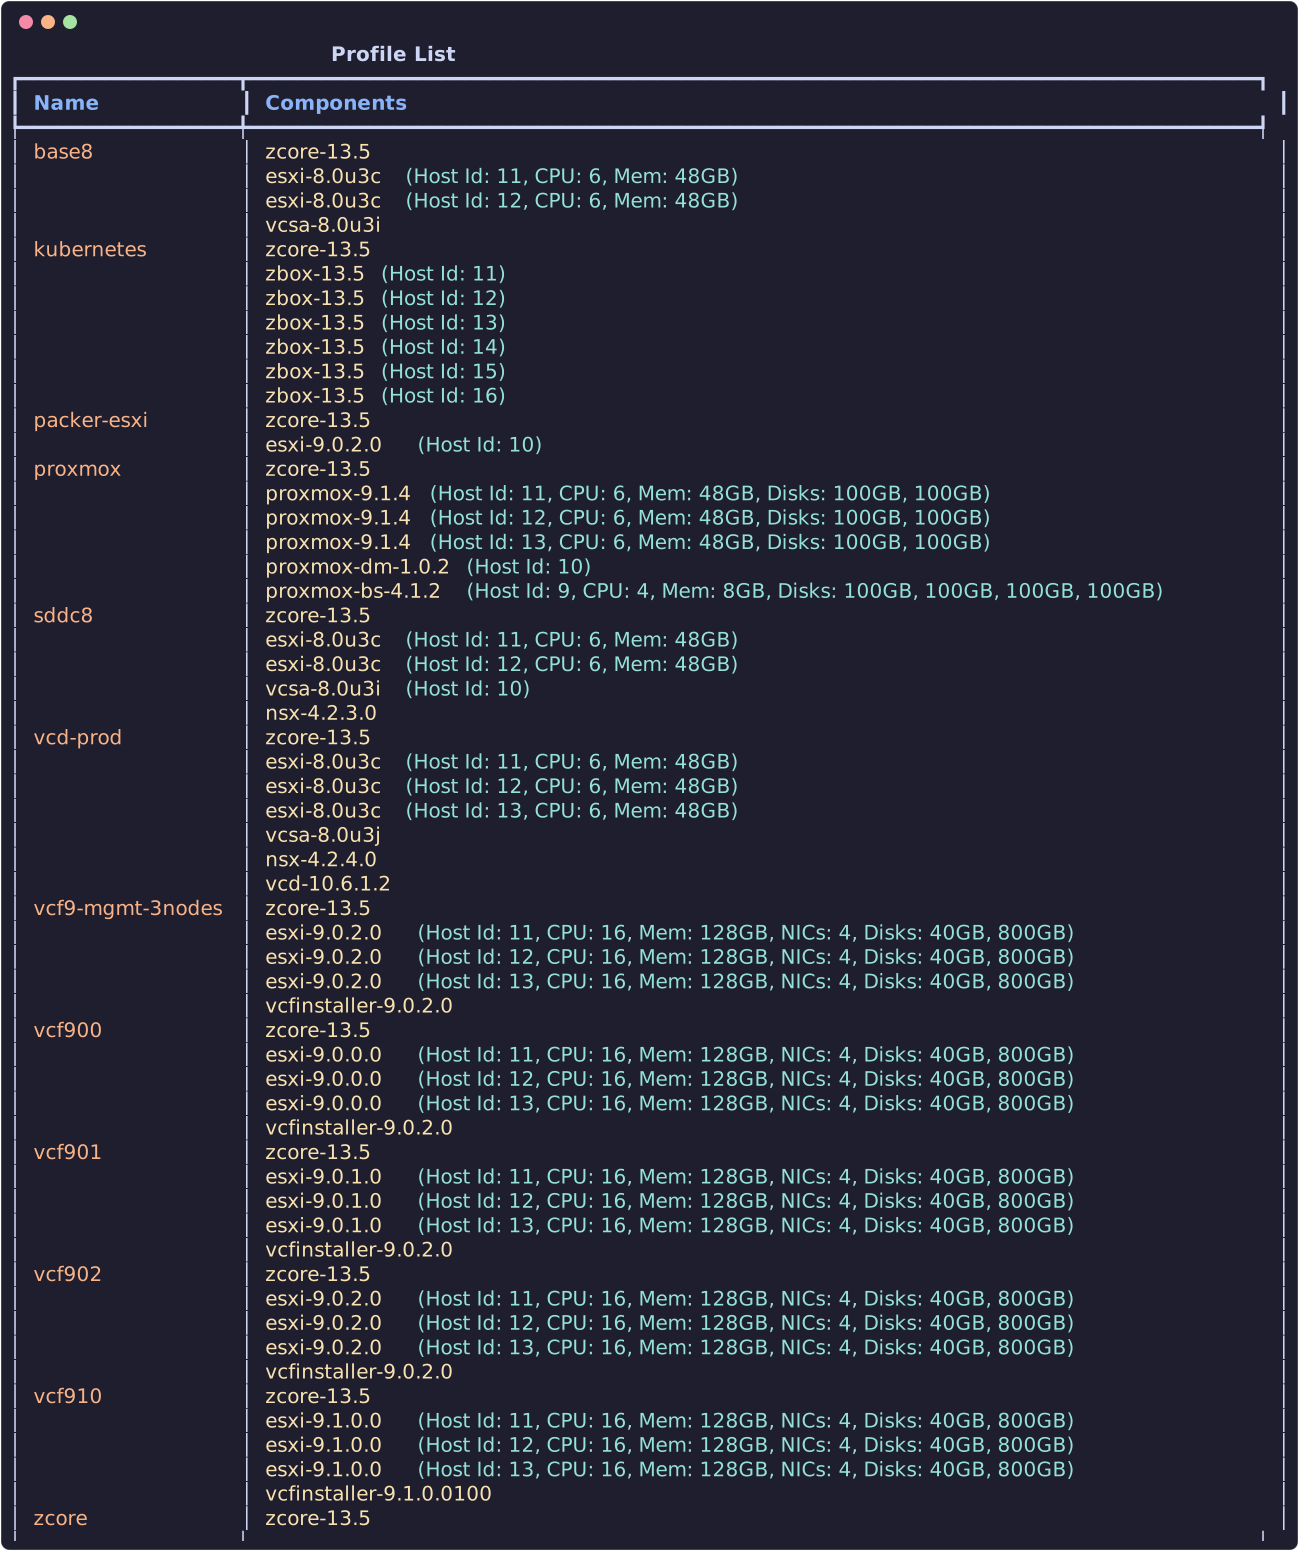
Profiles are a collection of components grouped together to form an initial nested environment.
They are the main entry point to deploy a nested environment and require a mandatory zcore-* core component as the first element (legacy zbox-* profiles must be migrated — see zcore migration).
The core appliance (zcore) provides DNS/DHCP (dnsmasq), NFS storage for nested ESXi hosts, and routing for the three additional /26 subnets on VLANs 64/128/192.
Profile entries support optional per-component overrides:
| Field | Applies to | Description |
|---|---|---|
host_id |
esxi, etc. | Management subnet host ID |
hostname |
esxi, etc. | Short hostname |
vcpu, vmem |
esxi, proxmox, etc. | Sizing overrides |
vnics |
esxi, etc. | vNIC count (integer, e.g. 4) |
vdisks |
esxi | Extra virtual disk sizes in GB (array of integers, e.g. [40, 800]) |
Use -j for JSON output (used by just zcore-transition and automation):
zcli profile info <name> -j
zcli profile create <name> -pf profile.json
zcli profile update <name> -pf profile.json
zcli profile delete <name>